Today post
is DIY idea that was in my head for so long but because of my lazy attitude it
took me a while to get along with it.
Being
a jewelry lover that I am; my love for arm candy is even built up more than it
used to be, they are just effortless. Simple ways to add a little flavor to
your appearance, put on a simple bracelet/arm candy, stacks them all together or just
embrace one bold statement piece.
In one
word they are very versatile.
This love
that I have manage to prolong has made me gather load of bracelet, bangles or
arm candy whatever you may want to call it, but it made me make my own bangle/arm candy holder which I am I proud of and want to flaunt it; so if you even want to know
how to make this arm candy holder then keep on reading.
For this D.I.Y
you’ll need:
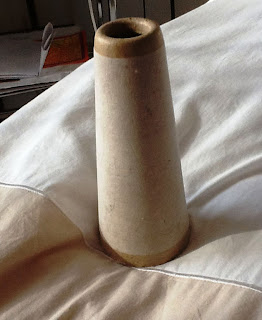
1. A thread holder i.e. that is cover
with thread ( I don’t know the proper name for it but here you can see in the
pic below by what I mean)
 |
| WITHOUT THE THREAD:) |
2. Asoft cardboard paper…i.e. easily
foldable and hard enough to be stable like you can use a cornflakes box, tissue
paper box whatever you may find in your home or get the cheap cardboard paper
whatever suits you the best.
4. and a Paint
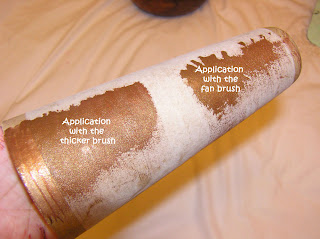
brush(of your choice -whatever you can find...but on the thicker side would be better -you can see the difference in the below picture)
That’s about it now let get to the
Process shall
we?!?!
1.
Get your thread holder and soft
cardboard paper ready and paint them on with your chosen color…..the first coat doesn't have to
be perfect just cover the whole thing up,let it dry and then apply the second
coat to give a flawless application .I promise no matter how wacked it look with
the first coat , the second coat will do the trick .....see
for yourself.
 |
| First Coat of Paint |
 |
| Second Coat of Paint |
 |
| The Finish Paint Product |
2.
After the paint dries completely, place 1 or 2 bangle on the soft cardboard to get the perfect fit so that you can easily secure it with a tape.
 |
| Secure with Tape |
Like so...
4.
Stack your bracelet/arm candies in your
preferred order.
And there you have it, you are finish with your own handmade simple easy to do yet
beautiful Arm candy holder.
Now play with the color make variety of them and
no need to worry on how to store your favorite arm candy and show them off
while they sit on your dresser :)
I made two of them and they just make my dresser cleaner and spunky looking...
Hope you all found this helpful.
Try it out and tell me how did it go?? and post your DIY bangle holder/Arm candy holder ...
I would love to see them
Till then
take care everyone...
Talk to
you all very soon :):):)

.JPG)


.JPG)
+copy.jpg)
This is such a great and creative idea darling! Love it! :))
ReplyDeleteXO,
http://www.rosychicc.com
Thanks you Darling....:)
DeletePlease Follow to get the new DIY that is shortly coming very very soon....:)
Take care...
Mauh