Monday 31 December 2012

New Year Nails Art....:)


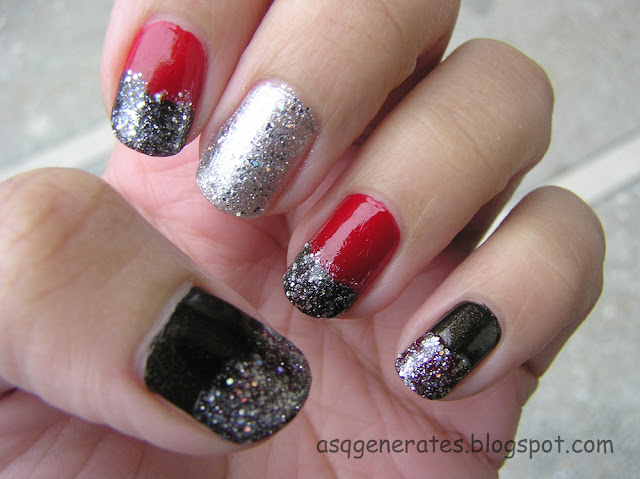
So here am I with a New Year inspired Nail Art that is super easy for the beginners in nail art department Its….Super Sparkling, Glittery, and Twinkly.


If you want to know how I created this nail art then keep on scrolling down and I will tell you everything:) 


New Year Nails Art finished product


For this Nail Art I incorporated the color that I think goes with the New Year eve Reds…Blackss…and Silver…J


Step 1:


I painted my thumb and Pinky finger a black colour which has these tiny gold shimmer:)

My Index Finger and the ring finger blood red colour :)
Then paint my Middle finger with a shimmery silver colour.

Red,Black and Silver painted nails


Step 2:


Starting from the pinky finger get a tape or you can get these french tip nail stencil and put that right in the middle of your nails:)

This step goes for all of your nail except the middle finger...leave that alone.


Note: You can skip this step and just eyeball the next step-this is just to make things easier.


Black polish nail with stencil


Red polish nail with stencil
Add caption

Step 3:
Now paint the tip of your nail with the opposite colour i.e. 
Red Base--Black shimmer tips 
Black Base-Red tips
After 2 to 3 seconds remove the tape/stencil.

Black tip on the red base


Black tip on the red base
The result you get after removing the tape:

after the stencil is removed


Step 4:

Now come the fun step- Applying glitter --on each and every nail tip
&
cover the Middle nail whole with glitter

Apply glitter on the tips

applying glitter on the tips

Don't forget to Finish this design with a Clear Top Coat as you need it for this one....to just make thing look merged in well....
It looks better this way....and polished looking...:)


New Year Nails Art showing off the glitter in different light

Hope you all like this & give it a try and rock this on….
And may this coming year bring lots of joy in your life and may you shine just like these nails and even more….

HAPPY NEW YEAR 2013 You all…


Monday 24 December 2012

Holiday Nail Art Part 2-Christmas Tree Inspired:)

Here is another super easy to create Nail Art design for you all.

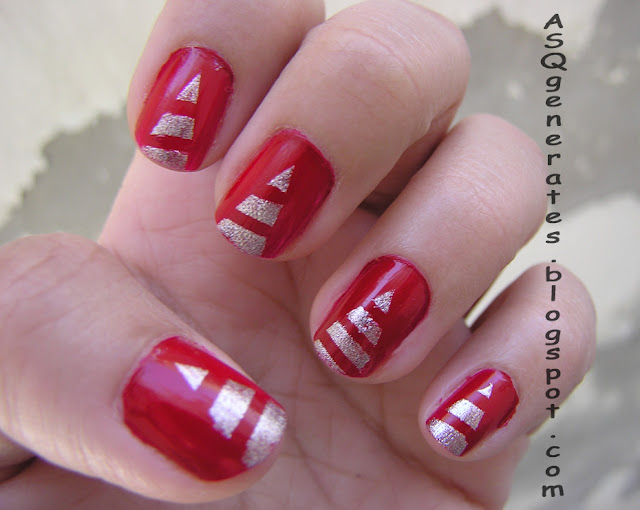
In this nail art I attempted to make Christmas trees that are easy to create and look intricate and unique.
I was very well happy with how it came out to be and wanted to share it with you, so here we go.


Step 1

Paint your nail with 2 coats of solid red colour.

rPaint the nail red color


Step 2

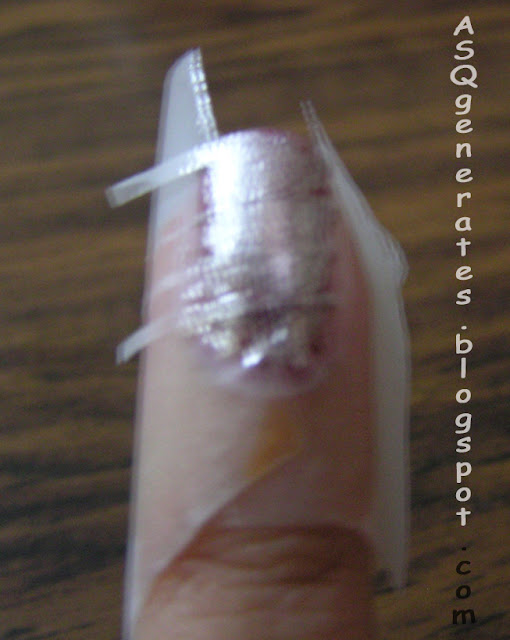
Start taping your finger ; just like the image below.

Create a tree like shape with tape on the nail


a) First put two tape on the side forming a triangle in the middle of your nail.

b)Then cut small line from your tape and place them across the triangle that you created leaving some space in between.


Step 3

Paint your finger with silver nail polish or any other combo you want .
Then peel off the tape after few seconds, but don't let it dry.

Paint on with a silver nail polish


After that Let the design dry off and finish off with a clear top coat.

And there you have your Christmas tree nail Art.

Super Easy yet Festive & Sparkly.


Remove the tape,apply top coat


 ……Hope you all have a lovely Holiday 

And enjoyed this design of mine and give it a try 
Share your recreation with me on my twitter  or on my facebook page 

Take Care.

see ya later....

Wednesday 19 December 2012

Nail Art : Inspired by Holidays

Hey everyone

Hope you all are having a fabulous day where ever you are….

 As a girl who loves doing nails but is not that great at nail art - when I see other people do their nailart with intricate design I feel so jealous of them wishing to have their talent or to have a budget to go to a professional.

But looking on the brighter side this made me inspired to create a pretty but simple and easy to do festive design.

I love it and thought some of you beginners who find nail art a pain but want to do something different with your nails will enjoy this as much as I did.

Now without further of me blabbering please go ahead and check the nail art out…..AND hey tell me if you like them ?


red and white nail polish nail tutorial

Things you will need:)


1)Red Nail Polish
2) White Nail Polish
3) Toothpick

that is it...it can't get any simpler;) 


Step 1: Paint your nail with a solid red nail polish.
         
Paint nail red color


Step 2: Grab the toothpick and your white nail polish.

Grab white nail polish and toothpick


Step 3: Dip the toothpick in your white nail polish.

Dip toothpick in white nail polish


Step 4: Put small dots with the toothpick mainly on your nail tip and a little bit upwards.

Create white dot on the tips


Step 5: Fill your ring finger with lots of dots,as your accent finger .

Ring finger the accent finger


Ring finger with lots of white dots
CLOSE UP OF THE ACCENT FINGER:)

Wait for the design to completely dry off so that you won't smudge the design and top of the design with your favorite Clear Top Coat to seal in the nail art. 

And there you go your Holiday Nail Art Design is ready in front of you:)


Apply top coat


Holidays Nails final look


Holidays Nails close up

Try this out and tweet me your picture @ASQgenerates I would love to see your take on it. 

Till then take care see you all very very soon:)

Love you all for taking the time out of your day and reading my blog it truly means a lot…..

Thank you.:)

Thursday 13 December 2012

Nail of the Week & Review -Golden Rose PARIS NAIL LACQUER/ POLISH


First of all guys I am so sorry for being gone -well almost 10 more day to go and 1 month complete….i am so sad …:( I was occupied with my dad work that I couldn’t take time out for my blog…but hopefully now I am back and will be posting more frequently….:)

So let’s begin with the :

Nail of the Week:


        I have seen so many people do these and I adore nail polish so why not pop these in here.

This week I was wanting something chic looking on my nails…and I saw 
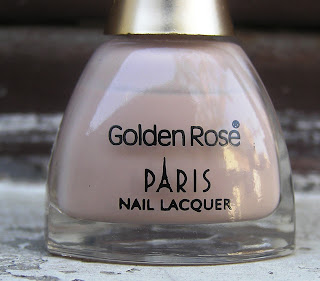
“Golden Rose PARIS NAIL LACQUER”  in beige #12 
sitting on my desk…. and it was staring right at me SO why not…...... I got this nail polish from my home country for PKR 125-130 and was not aware of this brand so I was very much nervous but interested to try out.

This is a very beigy nude pinky color close like the one used for the French manicure ,but in two coat you get this opaque beige polished nail look.

Golden Rose PARIS NAIL LACQUER packaging

At the first coat you won’t see a major difference …it come out as a very natural coat of beige but very pretty 
Golden Rose PARIS NAIL LACQUER first coat
First Coat:)

I wanted much more opacity so I applied a second coat and 
was
 impressed.

Golden Rose PARIS NAIL LACQUER 2nd coat
Second Coat


A very true to its color and most of the time I don’t see that with light colors.

Golden Rose PARIS NAIL LACQUER-quality of the polish

I was a Happy Bird for this week :)

 I don’t know how I didn’t use this nail polish before: 0

Sometimes you can see the nail line but that is not always… its not obvious or irritating. 


Secondly I will say that it can become a bit streaky if you are not careful but that what’s almost all the light color tend to do (or what I have experienced with most of my light colored nail polishes), but when applied correctly its applies beautifully,as you can see there is no crazy streak party on the nail.


Lasting day…..It lasted for almost 3 days…..you could stretch it out till 5 days.

Drying time….1rst coat took 5 mins
2nd coat -10 mins
Total Drying time  20min……and then its smudge proof…:)


And opps I almost forget…..

This is what the brush looks like 

Golden Rose PARIS NAIL LACQUER brush head

nothing to special as I like my brushes to be on the thicker side …
but as this get the job done I have no issues.

Would I Recommend it…….YES.

So have you ever tried this brand out or even heard of before?

 How was you experience?

And did you like this post???

Let me know….and please leave in your suggestion or idea in the comments below

Talk to You all very soon…

Take care you guys:)


Monday 5 November 2012

DIY-Arm Candy Holder


Today post is DIY idea that was in my head for so long but because of my lazy attitude it took me a while to get along with it.

 Being a jewelry lover that I am; my love for arm candy is even built up more than it used to be, they are just effortless. Simple ways to add a little flavor to your appearance, put on a simple bracelet/arm candy, stacks them all together or just embrace one bold statement piece.
In one word they are very versatile.

This love that I have manage to prolong has made me gather load of bracelet, bangles or arm candy whatever you may want to call it, but it made me make my own bangle/arm candy  holder which I am I proud of and want to flaunt it; so if you even want to know how to make this arm candy holder then keep on reading.


For this D.I.Y you’ll need:

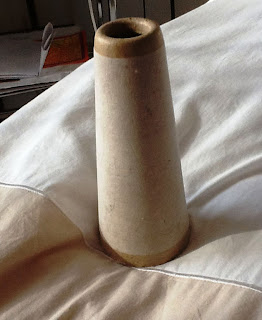
1.   A thread holder i.e. that is cover with thread ( I don’t know the proper name for it but here you can see in the pic below by what I mean)

thread middle section-after the thread is finished
WITHOUT THE THREAD:)

2.      Asoft cardboard paper…i.e. easily foldable and hard enough to be stable like you can use a cornflakes box, tissue paper box whatever you may find in your home or get the cheap cardboard paper whatever suits you the best.


cardboard piece of paper


3.      Acrylic paints-color of your choice 

Acrylic Paint


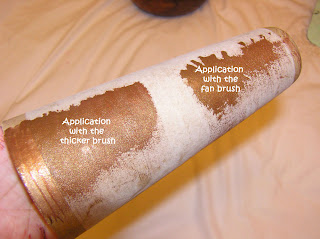
4.     and a Paint brush(of your choice -whatever you can find...but on the thicker side would be better -you can see the difference in the below picture)

painting on the thread middle section
Paint brush


That’s about it now let get to the 


Process shall we?!?!


1.      Get your thread holder and soft cardboard paper ready and paint them on with your  chosen color…..the first coat doesn't have to be perfect just cover the whole thing up,let it dry and then apply the second coat to give a flawless application .I promise no matter how wacked it look with the first coat , the second coat will do the trick .....see for yourself.

1rst coat of paint on cardboard
First Coat of Paint 
2nd coat of paint on the cardboard
Second Coat of Paint 

finish paint product
The Finish Paint Product


2.       After the paint dries completely, place 1 or 2 bangle on the soft cardboard to get the perfect fit so that you can easily secure it with a tape.
Securing the cardboard with tape
Secure with Tape
   Like so...          

securing the cardboard with tape

   
3.      Now place the soft cardboard on the painted thread holder piece thingy…..

Place the bracelet on the cardboard and the thread middle section

4.      Stack your bracelet/arm candies in your preferred order.


Stacking up the bracelet one by one

And there you have it, you are finish with your own handmade simple easy to do yet beautiful Arm candy holder. 

DIY-Arm Candy Holder finish product


Now play with the color make variety of them and no need to worry on how to store your favorite arm candy and show them off while they sit on your dresser :)


I made two of them and they just make my dresser cleaner and spunky looking...


DIY-Arm Candy Holder FINISH PRODUCT PICTURE


Hope you all found this helpful.

Try it out and tell me how did it go?? and post your DIY bangle holder/Arm candy holder  ...
I would love to see them

Till then take care everyone...

Talk to you all very soon :):):)


Monday 8 October 2012

Niki de Saint Phalle - “Nanas” Inspired Plastic Bag


When I was in studying fashion designing we had an exhibition -in which we had to be inspired by our own chosen artist and design and outfit using any kind of material as we wished.

I chose Niki de Saint Phalle - “Nana's Sculpture.
The bright bold colour just made me attracted toward the “Nanas” and I ran with the idea of using Plastic and Acrylic paint.

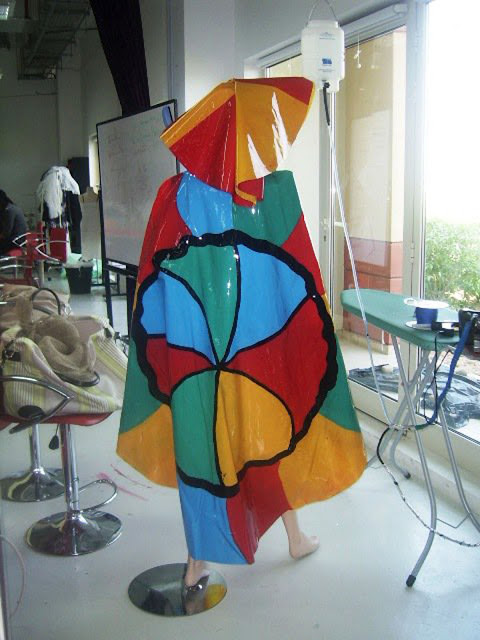
Now when I was designing this outfit that you can see below
…..I thought in my head on how this design would look on a bag/pouch/ make-up bag/ “anything you want and can put in it bag"-and as I had plenty of plastic left from my exhibit class I thought why not…let try this ….and I am so glad that I did….because I am in love.


Niki de Saint Phalle - “Nanas” inspired clothes


Niki de Saint Phalle - “Nanas” inspired clothes back view


As much as I loved my outfit we all know and can see its not a wearable look (its more or a creative work)….but you can surly use this baby up with anything
 I am really happy with the turn out and hopefully you also found it cute and carry-able. 


Niki de Saint Phalle - “Nanas” Inspired  Plastic Bag

the cute opening  <<<<<THE CUTE BUTTON

Niki de Saint Phalle - “Nanas” Inspired  Plastic Bag back view


It goes to show that when you have some creative idea in your mind and you’re not so sure that would it work out….it’s no harm in trying it out and experiment with your imagination it might turn out better than you imagined it and if it doesn't…..Don’t be hard on yourself and keep trying without quitting.

“You can’t always get what you want, but if you try sometimes, you might find, you get what you need”                        
                                           By The Rolling Stones.

Hope you all like this post and found it creative, enjoyable and pushed you to try out whatever the creative idea that is in your head and experiment with it. :) you might be surprised with it too,just like me…..
Take care guys….

Mauh.

See ya very soon.

Leave me a comment below.I love reading them.


Thursday 30 August 2012

Vaseline Petroleum Jelly Benefits for Eyelashes and Eyebrows


Are you looking to find a product that is cheap that would benefit your pretty eyelashes and eyebrows then you are at a right place buddy !!

Vaseline Petroleum Jelly is the bomb just for healthy eyelashes and eyebrows -trust me, its a well tried one. 
With applying Vaseline Petroleum Jelly on your lashes and on your brows you are not far from getting  fuller, longer, healthier looking eyelashes and eyebrows  

Vaseline Petroleum Jelly

 Since I have grown up my eyelashes seemed to be not at their best and as I use waterproof mascara it just makes things a lot harder  ,as its difficult to remove than a non waterproof mascara *I use -"Nivea beaute Extreme Resist Volume & 24h hold"- *

Plus as we grow up our body changes and while we care about other physical beauty inside and out .But unintentionally we somehow ignore our lashes which opens our eyes up  and brows which frames our  face so why ignore them and not give them the attention they need :)


Let's begin with the Benefits of Vaseline Petroleum Jelly For our eye area then without me just rambling on and on....


 Vaseline Petroleum Jelly Benefit number 1: 

                           A great eye makeup remover , many people suggest olive oil to remove your eye makeup but I do not know why olive oil just burns my eye like hell and it just doesn’t do the work for removing my eye makeup that well for me.

 So one day out of a whim  I tried out Vaseline Petroleum Jelly as my mother uses it too to remove her eye makeup so I thought why not try it out and I am glad that I did.
 No eye tugging or pulling simply apply small amount of  Vaseline Petroleum Jelly on your eye lashes and brows ,massage on few minutes and then with a tissue paper swipe that bad boy off gently and that is about it .
You will find that you any waterproof hard to remove makeup will get off with what so ever no efforts at all. 


 Vaseline Petroleum Jelly Benefit number 2 :

                              Longer, healthy, thicker looking lashes,within a week of applying Vaseline Petroleum Jelly I should say I started seeing difference which was surprising to me as I didn't expect my lashes and brows to start looking longer by any means.
 Actually my lower lashes *informed* me of them being longer and a tinny winy bit thicker, and that was enough for me to be sure that the Vaseline Petroleum Jelly was actually growing my lashes out!……
and since then I have started with a routine to sleep with Vaseline Petroleum Jelly on and my eyelashes just keep getting softer, healthier, longer, thicker and the same goes for my eyebrows even they are getting  thicker 
 (but hey just an FYI -my brows were never bad to begin with- thanks to my mom she never let me over pluck them even though I wanted to- but she never allowed me) . 


 Vaseline Petroleum Jelly Benefit number 3 : 

                               Make the mascara seem to go on a lot better too, as the lashes are in a good flexible condition which make the application smoother.
                                                                                   +
 Another trick that learnt and that I want to share is  first to curl your lashes, then put Vaseline Petroleum Jelly with a cotton swab or a clean mascara wand.
The reason to curl them and then put on Petroleum Jelly is because it will make the eyelashes a bit flexible and it kind of train the lashes to to go up and hopefully in some period of time the lashes won’t be stick straight. 
. finger crossed.

 Vaseline Petroleum Jelly Benefit number 4 :

                               Don't feel like putting any makeup on what so ever? just curl your lashes and apply Vaseline with a cotton swab or a mascara wand and get thicker looking lashes and this also will prevent you little flirty lashes from getting dry and brittle :)


That is about it you all. Hope you all fall in love with these tricks like I did and benefit from them too.

 Let me know your opinion, give me your input and any of your tips -I would love to hear your opinion. 

 Till then take care everyone. 

 I’ll see you all very soon.

Don't forget to leave your feedback and if you like my Blog please support by Following it would mean the world to me .

 Bye now.

Related Posts Plugin for WordPress, Blogger...